OBSVM9arm (For Mac users with the M series of chips)
There is now a version of Linux (Rocky LInux 9) that runs under the ARM64-based (aka Apple Silicon) chip. Instead of VirtualBox, this solution uses another emulator called UTM.
Installation
- Download/install UTM (Note that it is free to download from the website, but costs ~$10 on the Apple store).
- Download the OBSVM9arm virtual machine (29.09 Gbytes, md5sum = d82639f34cf2effa1122c3647df8e25d)
- Unzip OBSVM9arm-1.10.utm.zip (double-click the file icon). You will get a folder: OBSVM9arm-1.10.utm. You can delete the zip file.
- Run UTM. From the File menu, select "Open..." and open the OBSVM9arm-1.10.utm
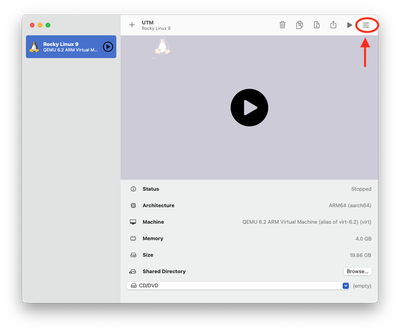
- You should now see "Rocky Linux 9" in the list of VMs (see figure at right).
- Click the settings icon (see red arrow in figure). Click the "System" tab at left and edit the resources you want to allow the VM to use.
Running the VM
Click the "play" button and this will boot up the VM. Shortly, you will get a login screen. Use the Observatory User (obsuser) account. The password is the same as the old Carnegie Observatories VISITOR WiFi password (A813A813B1).
Unlike previous versions of OBSVM, the obsuser now has administrator privileges, so you can more fully customize the operating system. Just be forewarned that if you break something, or introduce inconsistencies that render the software unusable, it will be your responsibility to fix it or re-download the entire VM.
Getting Your Data Into the VM
The drawback of using a VM, rather than installing natively on your computer, is that it only comes with a few GBytes of free virtual disk space. What you really want is to have the VM mount your local disks so that you can access your data directly as a mounted filesystem. With UTM, the easiest way to do this is using sshfs, a virtual filesystem that works over SSH. In fact, you can use sshfs to mount a virtual filesystem to any remote computer you have SSH access to, but here we will be connecting to the host computer.
- Spin up your VM and login using the obsuser account.
- Create a folder in your home directory (or anywhere else you have write access to). For example:
mkdir $HOME/mydata - Use the convenience command "mountsf":
mountsf [-u user] host-path guest-path
Where user is the user account on the host OS, host-path is the folder on the host OS to mount, and guest-path is the mount point in the guest OS. For example, to mount my external hard disk on my MacOS computer inside the guest OS:
mountsf -u cburns /Volumes/DATA ${HOME}/mydata - You should now be able to access /Volumes/DATA within $HOME/mydata
- To unmount the filesystem, simply use 'umount':
umount $HOME/mydata - If you get an error "Connection reset by peer", try removing all entries in the file .ssh/known_hosts
Keeping Up to Date
From time to time, we will upgrade the software in the VM. There is an 'update' command that obsuser can run in a terminal. It will check a repository and look for updates. If it finds one, it will be downloaded and installed. No need to re-download the entire VM as we used to do. Not only will this save time in downloads, it also means your local settings (shared folders, system settings, login scripts, etc) won't be overridden by an upgrade. You can run upgrade as often as you like.
Software Installed in the VM:
- Carnegie Python Distribution (CarPy3). This includes:
- MIKE Pipeline
- MagE Pipeline
- DPE Pipeline
- Miscellaneous python-based algorithms
- COSMOS2 and COSMOS3 reduction pipelines. Run "cosmos2" or "cosmos3" in a terminal to select the version you want to use.
- FSRED, the FourStar reduction pipeline (read /home/obsuser/FSRED/README for documentation). This includes as well:
- IRAF (Note: This is the iraf-community version, which is currently lacking several packages due to licensing issues).
- Maskgen v2.14 mask design software
- VPFIT and VPGUESS