The Carnegie Observatories Virtual Machine
Introduction
With the larger number of machine architectures, operating systems, and versions thereof, installing all the software on this site can be daunting. We have attempted to bundle most of it up into a virtual machine (VM). This allows you to run our software without having to install it in your native OS, but rather under a virtual OS. Preliminary tests show that running pipelines under VMs introduce minimal overhead.
NEW: For Apple Silicon users (M-series chips), there is a new VM available using a different client (UTM).
NOTE ABOUT CentOS 6 EOL: OBSVM6 (CentOS 6) is now depricated. The newer versions (OBSVM7 and OBSVM9) have the same software suite as OBSVM6, with the exception of some IRAF packages (notably STSDAS/TABLES) which, due to licensing issues, can no longer be installed. If you really need a complete IRAF with STSDAS/TABLES, continue to use OBSVM6.
Installing the VM
- Download/install VirtualBox using the installer most appropriate for your OS.

- Download one of the following VM appliances:
- OBSVM9 appliance (Rocky Linux 9, size: 13GBytes, MD5SUM: c7eb12f405dd7c1dd61684e130682159)
- OBSVM7 appliance (CentOS-7, size: 18 GBytes, MD5SUM: 799130238c11064223cfdbff5bfb355b)
- OBSVM6 appliance (CentOS-6, size: 9 GBytes, MD5SUM: c352826a815d9686278200683ae0dd7e)
- On most systems, you can simply double-click the downloaded .ova file and that will launch VirtualBox and install our VM. If not:
- Launch VirtualBox.
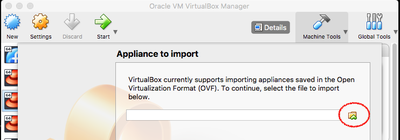
- Select File -> Import Appliance... from the menu.
- In the window that opens, click on the small folder icon next to the textbox (see picture)
- Select the downloaded .ova file
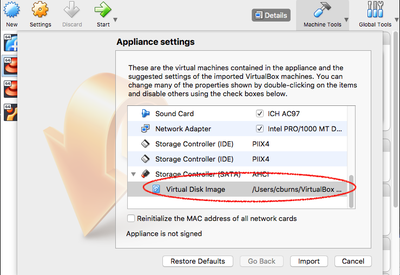
- You will be presented with a new window, showing multiple settings for your VM. The only option you might want to override is the location of the virtual disk. This will be on order of 16 GBytes and you may want to save it somewhere other than your home folder (the default).

Setting Resources
Because it's impossible to predict how much memory and how many CPUs the host computer will have, we ship the VM with minimal resources set (1 CPU and 4GB memory). Most likely, you will require more memory than this, especially if you are reducing large data sets. To update the resources, select the VM in the list on the left. Click the settings button (usually a yellow gear icon). In the window that pops up, choose the "system" button at the top. From there, you can adjust how much memory the VM will use on your system (under "Motherboard") and how many CPUs (under "Processor").
Using the VM
Once the VM is imported into VirtualBox, it will show up in the list of VMs on the left. Select OBSVM, then click the start button (green right-pointing arrow).
If VirtualBox quits unexpectedly and produces an error starting with "Kernel driver not installed (rc=-1908)", it means you need to tell your system to "trust" VirtualBox. Open System Preferences, go to "Security and Privacy". You should see a message about system software from "Oracle America inc." being blocked. Click on the "Allow" button, then try again.
You will see the usual CentOS boot screen, followed by a login screen. Use the obsuser account. The password is the same as the old Visitor WIFI on our Santa Barbara Street campus (A813A813B1).
When you first login as obsuser, run the command "update". This will download and install any updates to the installed code that have been made since the VM was created.
There is a README file on the desktop that has information on what software is installed. Generally speaking, the login shell has a start-up script (.tcshrc) that will initialize the environment. You should be able to run software right away.
Display Resolution
If you have a display that has high pixel density (e.g., Mac Retina display), the guest operating system may boot up in a very small window with fonts so small they are hard to read. You can fix this by shutting down the VM (if it's too hard to find the shutdown menu, just close the whole VM window). Once the VM has shut down, select it in VirtualBox and click the settings button. On the window that pops up, click the Display button. There, you will find a setting for "scale". Select a scale factor that makes the VM display at a comfortable size.
Accessing Your Data in the VM
The drawback of using a VM, rather than installing natively on your computer, is that it only comes with a few GBytes of free virtual disk space. What you really want is to have the VM mount your local disks so that you can access your data, as well as create new data, directly as a mounted filesystem. Luckily, this is relatively painless in newer versions of VirtualBox and only has to be done once.
 Before you spin up your VM, select it and click the settings button (yellow gear at top).
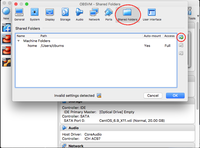
- In the window that pops up, select "Shared Folders" on the top button bar.
- The list should be empty below "Machine Folders". Click on the folder with plus sign icon on the right.
- Under "Folder Path", select "Other..." and then browse to the root of the folders you wish to share with the VM
- Under "Folder name", give it a name (you will use this to refer to the shared folder when mounting it in the VM). Something short is probably best.
- Do not click the "Auto-mount" option. If you do, the shared folder will be mounted at system boot, but all files will be owned by "root" and group owned by "vboxsf". obsuser is a member of vboxsf, so this might be "okay", but the permissions aren't guaranteed to be what they should be.
- By default, VirtualBox disables symbolic links in the guest OS, so you need to enable these. It's not an option available in the GUI, so open a terminal and enter the following command:
VBoxManage setextradata {VMname} VBoxInternal2/SharedFoldersEnableSymlinksCreate/{share} 1
where you replace {VMname} with the name of your VM (e.g., OBSVM7, OBSVM9, etc), and {share} with the name of the shared folder (home in the example image above). - Spin up your VM and login as obsuser.
- On the command-line, run the following command to mount the shared folder:
mount_sf <name> /media/sf_home
where <name> is the name you gave the shared folder in step 5. You can also choose a mount point in your home folder if you want, just make sure the folder exists and is empty.
Note that these steps will need to be repeated if you download a newer version of the VM in the future. With version OBSVM-1.4 or OBSVM7 and newer, however, that shouldn't be necessary.
Keeping Up to Date
From time to time, we will upgrade the software in the VM. There is an 'update' command that obsuser can run in a terminal. It will check a repository and look for updates. If it finds one, it will be downloaded and installed. No need to re-download the entire VM as we used to do. Not only will this save time in downloads, it also means your local settings (shared folders, system settings, login scripts, etc) won't be overridden by an upgrade. You can run upgrade as often as you like.
Software Installed in the VM:
- Carnegie Python Distribution (CarPy). The python2 and/or python3 versions are included. Run "source /opt/CarPy/Setup.csh" or "source /opt/CarPy3/Setup.csh" to select the one you want to use. Carpy includes:
- MIKE Pipeline
- MagE Pipeline
- DPE Pipeline
- Miscellaneous python-based algorithms
- COSMOS2 and COSMOS3 reduction pipelines. Run 'cosmos2' or 'cosmos3' in a terminal to select the version you want to use.
- FSRED, the FourStar reduction pipeline.
- IRAF (Note: This is the iraf-community version, which is currently lacking several packages due to licensing issues).
- Maskgen v2.14 mask design software
- VPFIT and VPGUESS
